Showing posts with label craftsy. Show all posts

Monday, August 6, 2018

Dying scrap fabric and making small zipper bags

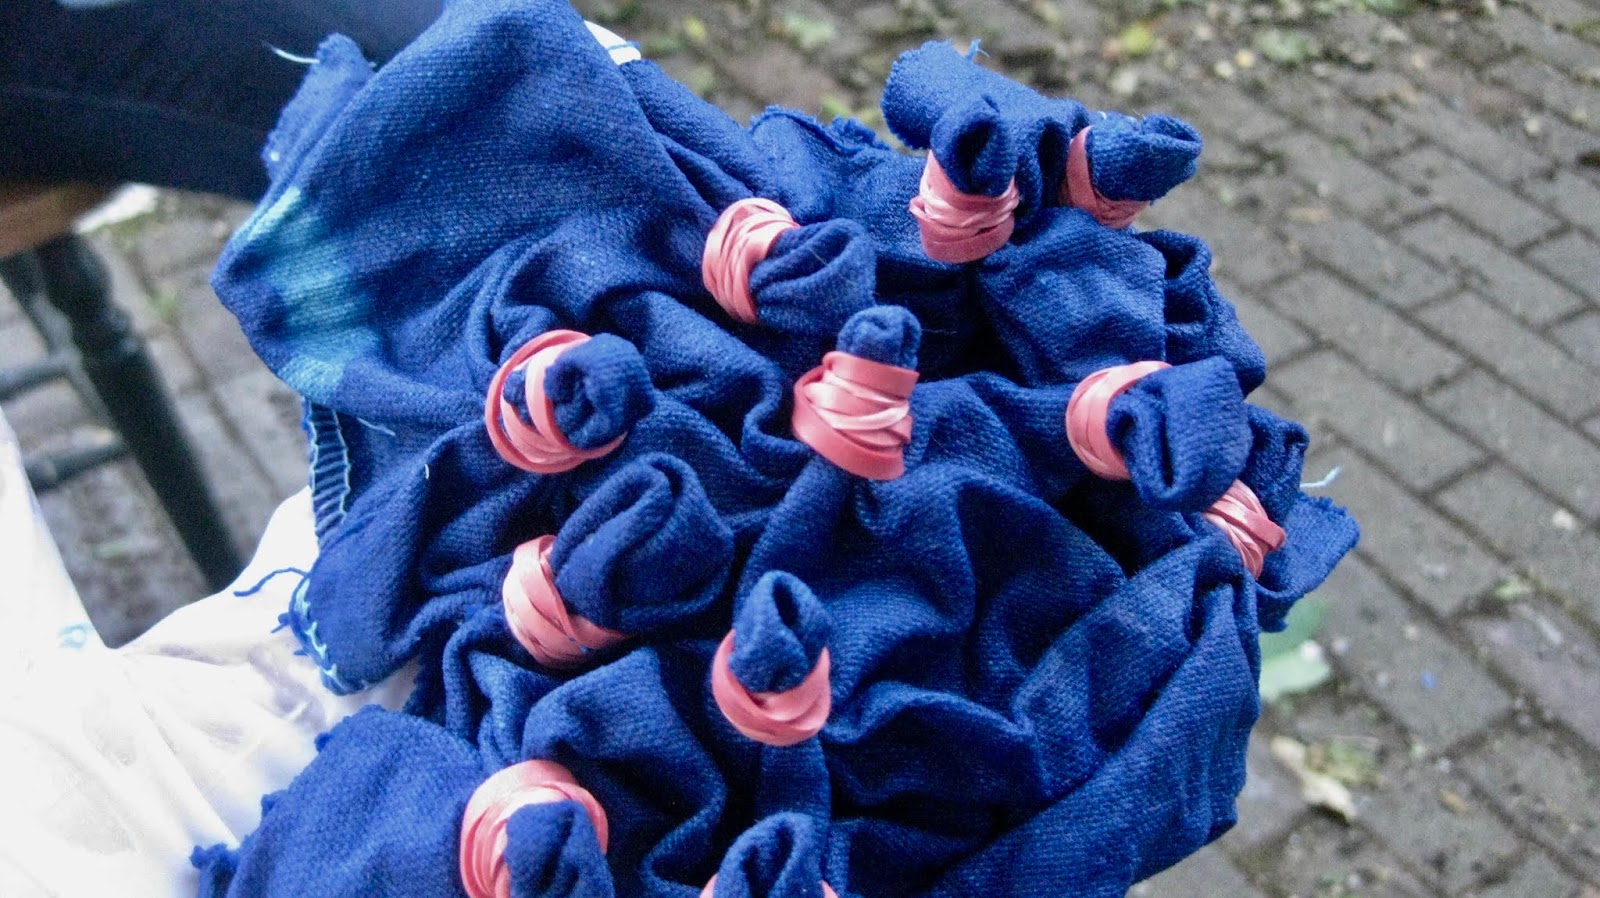
Over Memorial Day weekend I decided to dye some scrap canvas that I had sitting in my studio. The canvas was from some heavy canvas totes that were defective and the company sent me replacements. They did not want me to send back the defective tote bags. I kept thinking that I would make something with the fabric but I was not sure what to make. So I started by doing some Shobori wrapping designs. I'm kind of infatuated with indigo but since I did not have indigo I used some nice deep blue fabric dye that I had bought last year. We started by wrapping the 14x15 pieces of fabric in different ways to create various patterns on the fabric. We soaked about half the pieces of fabric in water before putting them in the dye as that is what the directions suggested. 

We found the fabric soaked in water took the dye more in the areas where we had expected the fabric to stay white in keeping with the Shibori patterns that we were making. You can see the pieces above the pieces on the left were not soaked in water, the pieces on the right were.


I liked the fabric that was not soaked in water before going into the dye as the contrast is stronger and I believe there is a clear design in the patterns. 
Our quilting guild is making small toiletry bags for a couple of charities and so I decided to make some from the heavy canvas. With the canvas you do not have to use a heavy interfacing to make the bags stiff. 
These other dopp bags needed some stiff interfacing to make them form a box like bag. I like making these bags as they are simple and cute, take less then 1/2 a yard of fabric and a zipper. So far I have about 6 bags to give to the quilting guild. The patterns are free on line. The large dopp bag is on Craftsy, the other zipper bag is free on Noodlehead.

Monday, December 4, 2017

Sewing with Knits


I took a Craftsy class about 3 years ago called Sewing with Knits by Meg McElwee. I made a pair of yoga pants that were a disaster. The fabric I used was too stretchy and thus fell off me when I put them on. I liked the class, it gave me a lot of information about different types of knit material and how to work with different knits. Meg explained a lot about how to work with different knits, what to look for when choosing knits and how to do stretch tests to make sure your knit material with rebound. 
I was also surprised at all the different patterns that came with the class. There is a fleece hoodie, 2 different t-shirts, yoga pants and a dress. Printing out patterns and taping them together is such a pain in the ass I never printed out any other patterns from this class. A couple weeks ago I finally went back and printed out the pattern for the scoop neck shirt. I was getting tired of the old standard Jalie pattern that I have been using for the last 5 years and wanted something a little different. 

I usually do not add a neck band when I make t-shirts as they are always the first thing I cut off on ready made t-shirts. But this pattern is a bit of a scoop neck so I thought it would be fine to add a neck band...I'm glad I did. If I had not added a neck band I think the neck line would have drooped and looked shabby. 
I made another shirt to make sure I had the pattern down, this one I screen printed and gave to a friend. Actually it's a reverse screen print. When you use Soft Scrub as ink it will bleach out the material leaving an image in the material that is soft and part of the material. There is no ink sitting on top of the material. 
I wore my shirt a couple of times and decided I wanted the shirt a little longer. While watching the class again to get some specifics I saw a part about adding a hem band. I decide to add a band of material around the bottom of the shirt.  


I used a knit sheet that I found at a thrift store to make both of the shirts.  The sheet was an Amazon Basic King size sheet that was 100% cotton. There were a couple of small holes in the middle of the sheet, I have a feeling that is why it was donated to a thrift store...no problem for me as I cut around the holes. I have enough material to make one more shirt. It's an attractive grey color that will go with anything. I may try to make a v-neck or a longer sleeve shirt with the remaining material 


I think this scoop neck shirt is my new favorite. I expect to make more of these shirts and want to try making a dress version. I think this pattern will also work great in repurposing old t-shirts that are too large. 


Friday, October 6, 2017

1981 Volvo 240 Interior turned into a Bag


I tend to gather odd textiles, last year a friend gave me some white vinyl that he pulled off the interior seats of a 1981 Volvo 240 station wagon. I was not sure what I would do with the fabric but I took the fabric with the though that I would turn it into an outdoor pillow or cover an outdoor chair.  The other day I was getting ready to teach a free workshop on reuse. I like to show participants how to make a bag that I found in a free Craftsy class taught by Kristin Link. Kristin ran the website SewMamaSew for several years. In 2015 she started a website called Craft Industry Alliance with another woman. I like to make her bags because they are quick and are perfect for repurposing found textiles. I have used old shirts, jeans and table runners to make these bags in the past. 

As I was looking around at all my stray textiles I saw the large bundle of vinyl. It immediately though it looked like the perfect material to reuse for this workshop. I looked at several tops and handles for the bag before settling on a simple black to make this a sleek and modern looking bag. I wanted a bit of color and found a Hawaiian print dress that I had set aside because I really liked the color and the fabric of the material. The dress was cut on a slight bias so the fabric was difficult to lay out and sew together.  
The out side of the bag is simple to cut out, I used wonder clips to hold the fabric together instead of pins which make holes in the vinyl. I also used a longer stitch length about 3.5 so that the stitching would not just perforate the vinyl and cause the seams to tear apart. 
The biggest problem I had was the interior. Since I used a dress I had issues with some of the fabric that was cut on the bias. It stretched out a little and became a little off shape as I sewed the interior together. I did manage to get it sewn together and I know of these issues are not apparent when you look at the bag. 


I like the way the bag turned out and plan to make another one. This time I will cut the interior so that I do not have as many problems with the bias. I have a Hawaiian shirt that I can cut up and this time the fabric is cut on the straight of grain so the lining should be a little easier to sew. 

Wednesday, December 16, 2015

Bags for Christmas


I'm kind of hooked on this bags that I learned how to make on Craftsy. It's a free class by Kristin Link who runs the very successful website Sew Mama Sew. I have a lot of upholstery fabric scraps. I had about 4 yards of some black suit wool that I bought at Scrap in Portland. The interiors are all from my fabric collection. The flower fabric above is a piece of barkcloth that I have had for a very long time. I kept thinking I would make a pillow to show off the print. The gold fabric is a piece of upholstery fabric that has a dragon on it. I used some gold lame fabric that I bought at garage sale several years ago (I have about 1/2 a bolt of the gold lame). I was not sure what I would make with gold lame but this is the perfect project to use up the fabric as liners for the bags.


 I put my label on the inside of a couple of the bags. This was more as a way to show the person I'm giving the bag to that I actually made the bag. These are the labels that I put on the clothes I make. I like that the labels match the gold lame fabric. I used some old white handkerchiefs that belonged to my father for one of the bags above. I try to use up as much textile scrap as I can, I really had to see any textile go to waste.


I had a very cute linen table runner and thought that it would make a great bag too. So I cut out the a piece to show off the print on the fabric. The tapestry bag is another piece of heavy upholstery fabric, it really feels like a needlepoint. This was another piece that I have had for awhile and I was going to try to use it to recover a small chair. I instead decided that it needed to be used for one of these bags.


My neighbor gave me several different pieces of fabric with birds that she had bought on-line for curtains. She was not sure which pattern she wanted so she bought a few different pieces of fabric. The fabric above was a little stiff, it feels more like a canvas and more then likely would not have made nice curtains. I made a couple of different bags, one with the black wool fabric and one with jean material (another gift from a friend that knows of my textile hoarding problem). I like them both, the jean material bag on the right feels a little more casual then the black wool bag.

And another bag with the black wool and some bark cloth. Again I was going to make some curtains from the bark cloth but there was not really enough, so it has sat in my stash for some time. These bags are a great way to highlight a small piece of lovely fabric. And they take about an hour or less to make. 

I have collected a few needlepoints to use in future bags as the focal point. I often look for needlepoints at thrift stores, garage sales and estate sales. You can find some interesting things at estate sales. This year for Christmas everyone is getting a home made bag filled with home made preserves.