Showing posts with label upholstery. Show all posts

Monday, June 18, 2018

Our short VW ownership adventure


We bought a 1985 VW Vanagon from a friend. He originally told us he wanted to sell it for $2100...which I understand is a good price. But we really didn't need the van so paying that much for something we didn't need was not going to happen. Than 6 months later he offered us the van again for $1000, then it went down to $500. He didn't want to sell it on Craigslist and have a ton of people come over to his house to dicker with him. It was in some disrepair and  he knew that people would give him a hard time and try to get him to lower the price. So we ended up buying the van.

Once we got it home we needed to get a new battery, it was still having some starting issues so we had a new starter put in...that cost was $575. We knew we needed to put some money into the van so that cost was not out of the question. After the first repair I decided that it was time to commit to this vehicle and redo the interior...as it was really rough.


Since the van was blue I decided that jean material was the way to go. Used Jeans are easy to locate (I already had a large bin of used jeans) and the material will stand up as upholstery. We started by pulling out the seats. The seat part of the back seat was shot so we ordered a new piece of foam. I started on the large piece of foam that was part of the bed in the very back. The cover was a zippered slip case and the foam was still in good condition. I decided to reuse some of the slipcase...at least the zipper part of the slip case (I really don't like to install zippers and this was a 6 ft zipper).
The cover came out a little wonky but still worked. I pieced together used jeans for the top of the slipcase, trying to use some of my more interesting old jeans. For the back of the pad I used one large piece of jean material because I had a large bolt of jean material that a friend gave us about 5 years ago. Once the back pad was done I started on seats. I patched together some jean material to and stitched the material to the slipcase for the back seat. The layers of material were quite thick but I was able to make it work.


Then the foam for the seat part of the back seat came in and it was just a matter of stapling the material to the seat.

Now with all the seats and pads covered we turned our focus to the ugly side panels. I started to pull the panels off and discovered that they were made of actual paneling. I patched together some jean material on some of the panels and used large piece of material from the bolt of jean material on others. I spray mounted the panels and then stuck the jean material to the panels. I used metal binding clips to hold the material on as I turned and glued the material on the panels. I really wanted to use some of the more interesting pieces of used jean to show off that I used recycled jeans. I kept a pocket on a a couple of pairs of jeans that can be useful on one of the panels and on one of the pads. I used some jeans that someone did a really nice piece of embroidery on the leg and I used some jeans that were covered in embroidery stars.


After we got it all recovered we took it for a run. Now another problem arose...the clutch was going out and we were not able to get the van up to 50 mph on the freeway. So back to the repair shop for a new clutch...and a couple other minor items like belts and such..that cost $650.

So now we are out about $1700 for the van, less that the $2100 our friend origionally wanted for the van and it's in better shape.


The best out come of this story is we sold the VW for a lot more than we paid, we were done with trips to the mechanic, and it was getting expensive. We decide that we could cut our loses on this one. Oh well there will be other vans for us to fix up and go camping . 

Sunday, November 26, 2017

Pants, Shirts and a Tin Ceiling


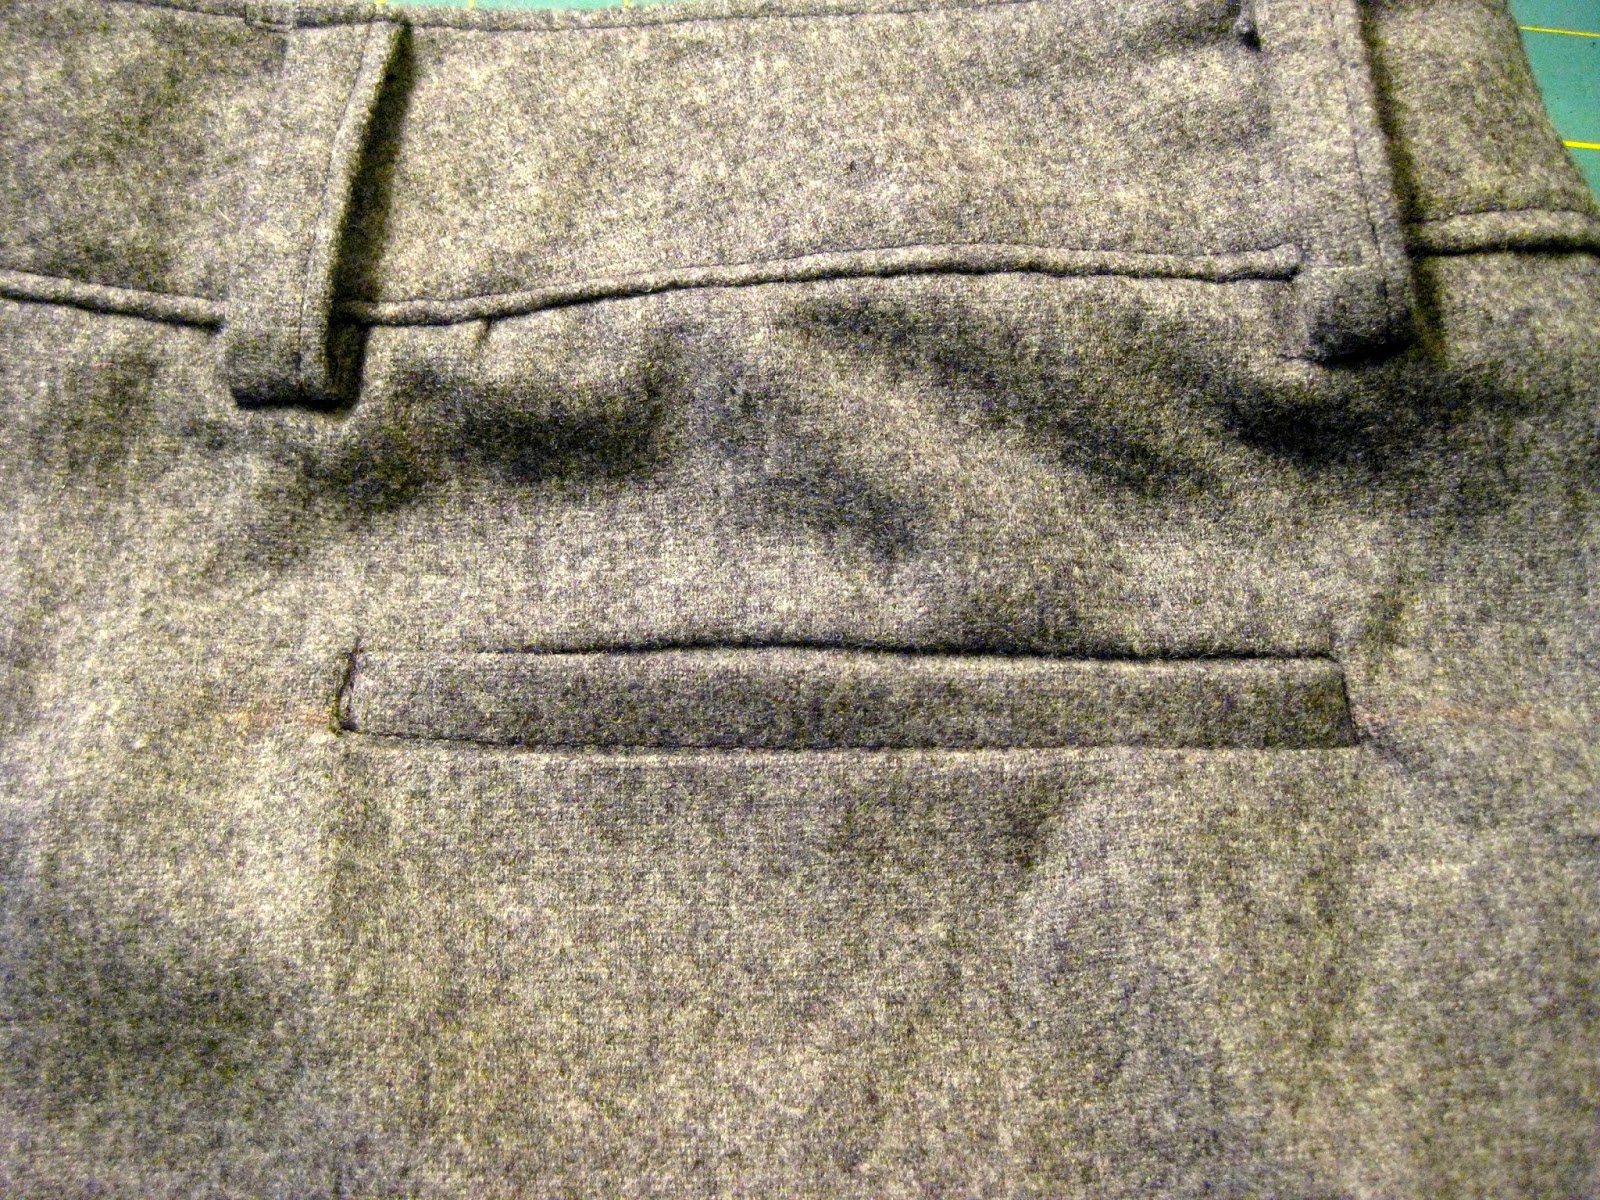
My husband has been asking me for another pair of wool pants for a couple of months. So last September when Pendleton Wool was having their annual sale I picked up some nice grey wool to make a pair of winter pants for my husband. I used Vogue 8719 again as I have come to perfect this pattern for him over the last couple of years. Each time the pattern gets easier and easier. 
Again he wanted welt pockets in back instead of the patch pockets that are on the pattern. I'm getting a little batter as the welt pockets, the last couple of times I had cut the hole too large and had to do some funky repair so they didn't get any larger. That included adding some interfacing the the sides to bond the fabric back together. This time I really took my time and paid attention to how far I was cutting and where I was cutting. I also used a light weight material for the pockets which I think helped make the pockets lay flatter and not bunch up like the cotton material did on the last pair of pants. 


After the pants I was able to get the Hawaii Shirt made. I cut this pattern out back in June and it sat on my sewing table for several months. I was able to get the shirt done on one afternoon. It's an easy pattern, Butterick 6015 from about 1980. I have made this shirt several times before for my husband and he really likes this pattern as it's slightly snug but not tight, it has 2 breast pockets and small slits on the sides. He picked out some nice ivory buttons and now he is wearing the shirt with his new pants. If you don't remember this is the fabric that we bought back in January of 2017 in Hawaii. I let my husband pick out material for a shirt or pants when we travel. That way I get to shop for fabric while we are on vacation and it makes the piece of clothing a little more special because it reminds us  of our vacation. 

Last month we celebrated our 10th wedding anniversary. Since Tin was the traditional gift for 10 years I bought a tin ceiling for my husband. The funny thing is we have been looking at 3 different patterns for about 3 years, we just could not come to an agreement on which one we wanted. I wasted a softer more organic look, husband wanted a more square art deco type of pattern. We put up 3 different tiles and had all of our friends tell us which one they liked. It was always a toss up on who got the most votes. So when I saw that Tin was the gift for our 10th anniversary I decided to give in and buy the tin tile that my husband wanted. The good thing about this ceiling is now I will get a hood for my stove. Which has to go in before we complete the kitchen. SO...now my husband has a project to complete this winter and that means I will have more time to sew.


A friend gave me an old shirt that he was going to toss out. I cut up the shirt using a Jallie pattern 2805 making it a more feminine shirt. Once I made it over I realized how grungy the white material had become...so I dyed it. I did a string wrap of the shirt and set it in some dark blue dye for 24 hours. It came out a little darker than I wanted but it's still a cool shirt & really comfortable. 
A friend recently asked me if I could do a small upholstery job for him. He had an old Telephone Table that the seat had ripped and the stuffing was coming out. With a lot of these older vinyl chairs the vinyl gets dry and brittle, I for one have cut my legs on older vinyl chairs where the material has become ripped and is sharp. I had a head liner from a 82 Volvo that a friend gave me, I had made a couple of bags with that material and it looked perfect for the seat of the table. I took it over and left it on is porch. He called me later as he was happy to see the seat repaired and thought it looked great. 

And last but not least...I want to say Thank You to my mother..who would have been 81 yesterday. She sent me to sewing lessons when I was about 12 years old. She encouraged me to sew as she came from a family of women that sewed. My great Grandmother made quilts and my grandmother made clothes for her and my mother. My mother in turn made clothes for my sister's and myself. When I turned 18 my parents gave me a sewing machine. I used the Montgomery Wards sewing machine till about 6 years ago when I finally bought a new more up-to-date machine. I still have the Montgomery Wards machine to this day. I miss my mother and every day think of things I did not get to ask her, she was a wealth of knowledge when it came to sewing and gardening. 

Wednesday, December 16, 2015

Bags for Christmas


I'm kind of hooked on this bags that I learned how to make on Craftsy. It's a free class by Kristin Link who runs the very successful website Sew Mama Sew. I have a lot of upholstery fabric scraps. I had about 4 yards of some black suit wool that I bought at Scrap in Portland. The interiors are all from my fabric collection. The flower fabric above is a piece of barkcloth that I have had for a very long time. I kept thinking I would make a pillow to show off the print. The gold fabric is a piece of upholstery fabric that has a dragon on it. I used some gold lame fabric that I bought at garage sale several years ago (I have about 1/2 a bolt of the gold lame). I was not sure what I would make with gold lame but this is the perfect project to use up the fabric as liners for the bags.


 I put my label on the inside of a couple of the bags. This was more as a way to show the person I'm giving the bag to that I actually made the bag. These are the labels that I put on the clothes I make. I like that the labels match the gold lame fabric. I used some old white handkerchiefs that belonged to my father for one of the bags above. I try to use up as much textile scrap as I can, I really had to see any textile go to waste.


I had a very cute linen table runner and thought that it would make a great bag too. So I cut out the a piece to show off the print on the fabric. The tapestry bag is another piece of heavy upholstery fabric, it really feels like a needlepoint. This was another piece that I have had for awhile and I was going to try to use it to recover a small chair. I instead decided that it needed to be used for one of these bags.


My neighbor gave me several different pieces of fabric with birds that she had bought on-line for curtains. She was not sure which pattern she wanted so she bought a few different pieces of fabric. The fabric above was a little stiff, it feels more like a canvas and more then likely would not have made nice curtains. I made a couple of different bags, one with the black wool fabric and one with jean material (another gift from a friend that knows of my textile hoarding problem). I like them both, the jean material bag on the right feels a little more casual then the black wool bag.

And another bag with the black wool and some bark cloth. Again I was going to make some curtains from the bark cloth but there was not really enough, so it has sat in my stash for some time. These bags are a great way to highlight a small piece of lovely fabric. And they take about an hour or less to make. 

I have collected a few needlepoints to use in future bags as the focal point. I often look for needlepoints at thrift stores, garage sales and estate sales. You can find some interesting things at estate sales. This year for Christmas everyone is getting a home made bag filled with home made preserves.


Saturday, March 7, 2015

Zipper bags

I have been obsessed with these zipper bags since I learned how to make them on Craftsy. It's a free class with Kristin Link of Sew Mama Sew. They are easy and take up very little fabric, about a fat quarter of fabric. I made 3 more the other evening in about an hour. I use scrap leather for the little handle on the left of the bag. Though I really like these bags they are a little large for my purse. I needed something to hold change instead of just dropping quarters into my bag. Then I found this tutorial!!! on making small triangle pouches. 


I made 2 pouches.  The first one is the tan one made from scrap upholstery fabric. The fabric was a little heavy so I had some problems sewing it all together. Also the original tutorial called for a 4" zipper. I had a 6" zipper so I just increased the size of the bag. It turned out a little too large, not to mention that it also was too bulky. I had some problems turning it inside out too as I forgot to unzip the zipper. I decided to try to make another one. I had taken a zipper out of a dress a couple weeks ago and I cut that red zipper to 4". I used some more scrap material, it was a heavier fabric but not a heavy upholstery fabric like the tan fabric. I whipped this little blue one up in about 15 minutes. The best thing is when you unzip the pouch you can see everything inside. The other change purse I had was problematic because the opening was so small I could not see inside and often had to dump all the change out on the counter. It was a little frustrating for folks in line behind me at the grocery store. I love these little pouches. I want to make a bunch of them using crushed pennies as zipper pulls. 

I saw this quilt hanging on the wall at Modern Domestic when I was in there to sign up for a class. I really like the quilt. The quilts that are currently on the wall are all made by instructors at Modern Domestic. I forgot to look at who did this quilt but I wanted to share it because I really like the design.  I love the deer head and the quilt is quilted all over with a tree pattern, a very Northwest quilt. 

Thursday, September 11, 2014

One hot afternoon 


Last week it was quite hot so we headed down to Kelly Point Park past St Johns. It was nice to sit in cold water watching boats go past. I'm busy sewing to see what I can make quickly and is interesting enough to sell at a farmers market or on Etsy. I was talking to a friend and she told me she sells tons of reusable bags where she works. I decided to try my hand at making bags. I have made other recycled bags but I think vintage fabric and ribbon is a hit. These bags are about 20" tall by 18 " wide. They are easy to make, it's all about the gusset on the bottom to give the bag some structure. I used some scrap upholstery fabric and some really beautiful vintage ribbon for the handle. The thins is I have tons of scrap fabric that I can use to make a few of these bags, making all of them unique and one of a kind. Most of the time for me is spent decided on color combinations.