Monday, December 4, 2017

Sewing with Knits


I took a Craftsy class about 3 years ago called Sewing with Knits by Meg McElwee. I made a pair of yoga pants that were a disaster. The fabric I used was too stretchy and thus fell off me when I put them on. I liked the class, it gave me a lot of information about different types of knit material and how to work with different knits. Meg explained a lot about how to work with different knits, what to look for when choosing knits and how to do stretch tests to make sure your knit material with rebound. 
I was also surprised at all the different patterns that came with the class. There is a fleece hoodie, 2 different t-shirts, yoga pants and a dress. Printing out patterns and taping them together is such a pain in the ass I never printed out any other patterns from this class. A couple weeks ago I finally went back and printed out the pattern for the scoop neck shirt. I was getting tired of the old standard Jalie pattern that I have been using for the last 5 years and wanted something a little different. 

I usually do not add a neck band when I make t-shirts as they are always the first thing I cut off on ready made t-shirts. But this pattern is a bit of a scoop neck so I thought it would be fine to add a neck band...I'm glad I did. If I had not added a neck band I think the neck line would have drooped and looked shabby. 
I made another shirt to make sure I had the pattern down, this one I screen printed and gave to a friend. Actually it's a reverse screen print. When you use Soft Scrub as ink it will bleach out the material leaving an image in the material that is soft and part of the material. There is no ink sitting on top of the material. 
I wore my shirt a couple of times and decided I wanted the shirt a little longer. While watching the class again to get some specifics I saw a part about adding a hem band. I decide to add a band of material around the bottom of the shirt.  


I used a knit sheet that I found at a thrift store to make both of the shirts.  The sheet was an Amazon Basic King size sheet that was 100% cotton. There were a couple of small holes in the middle of the sheet, I have a feeling that is why it was donated to a thrift store...no problem for me as I cut around the holes. I have enough material to make one more shirt. It's an attractive grey color that will go with anything. I may try to make a v-neck or a longer sleeve shirt with the remaining material 


I think this scoop neck shirt is my new favorite. I expect to make more of these shirts and want to try making a dress version. I think this pattern will also work great in repurposing old t-shirts that are too large. 


Tuesday, November 28, 2017

Garden Huckleberries...some jam and a dessert

I have a nice plot up in the community garden about a block from my house. Last year someone started growing bushes of Garden Huckleberries. I watched as they grew into a beautiful dark almost black berries. I wanted so much to pick the berries as I have a fascination with berries that you don't see regularly in the stores. I had heard that Wild Huckleberries are delicious but difficult to find. So when I saw that someone was growing Huckleberries in the garden I was envious. 

Well lucky for me...last week I was up covering my small space with leaves for the winter and walked past the plot that had the Huckleberries. The plants had been pulled from the ground and stacked to the side with other discarded shrubbery from the plot. Why would someone spend the summer growing something only to toss it out? The berries were on top and they looked fresh. So I went home and got a large bowl, I went back and picked all the discarded berries I could. 

I was a little afraid of how to use these precious berries. I had bought some local made huckleberry jam this summer to see what it tasted like and though I like it...it was a little tart. So I was not sure what to make with the berries...Did I really need more jam? After some research I found that Garden Huckleberries are a little sweeter than the Wild Huckleberries. 
 
I looked at a couple of recipes to use the berries in. Everything I found said that Garden Huckleberries have to be cooked before you can eat them and I wanted to make a pie or other dessert of some kind. I found this recipe for Double Ginger Huckleberry Cobbler. It was on a hiking web site and called for one cup of Huckleberries. You put a Bisquick mixture on top and let it cook in the pot with the lid on for about 12 minutes. I of course added some whipping cream and had a wonderful dessert. It was sweet but not too sweet, the flavor had a soft almost floral taste. I fell in love with this dessert.  Since it had a wonderful soft sweet taste I decided to make some jam. 

I was able to get 3-8oz jars and 3-4oz jars of jam. One jar broke when I put it in the water bath. That is only the second time I have had a jar break in the water bath in 30 years I have been canning. Though I was a little upset it had to happen to my Huckleberry Jam. I can't wait to try this on an english muffin or maybe a sauce on some salmon. Either way...I think next year I will try to grow my own Garden Huckleberries in my community garden plot. 

Sunday, November 26, 2017

Pants, Shirts and a Tin Ceiling


My husband has been asking me for another pair of wool pants for a couple of months. So last September when Pendleton Wool was having their annual sale I picked up some nice grey wool to make a pair of winter pants for my husband. I used Vogue 8719 again as I have come to perfect this pattern for him over the last couple of years. Each time the pattern gets easier and easier. 
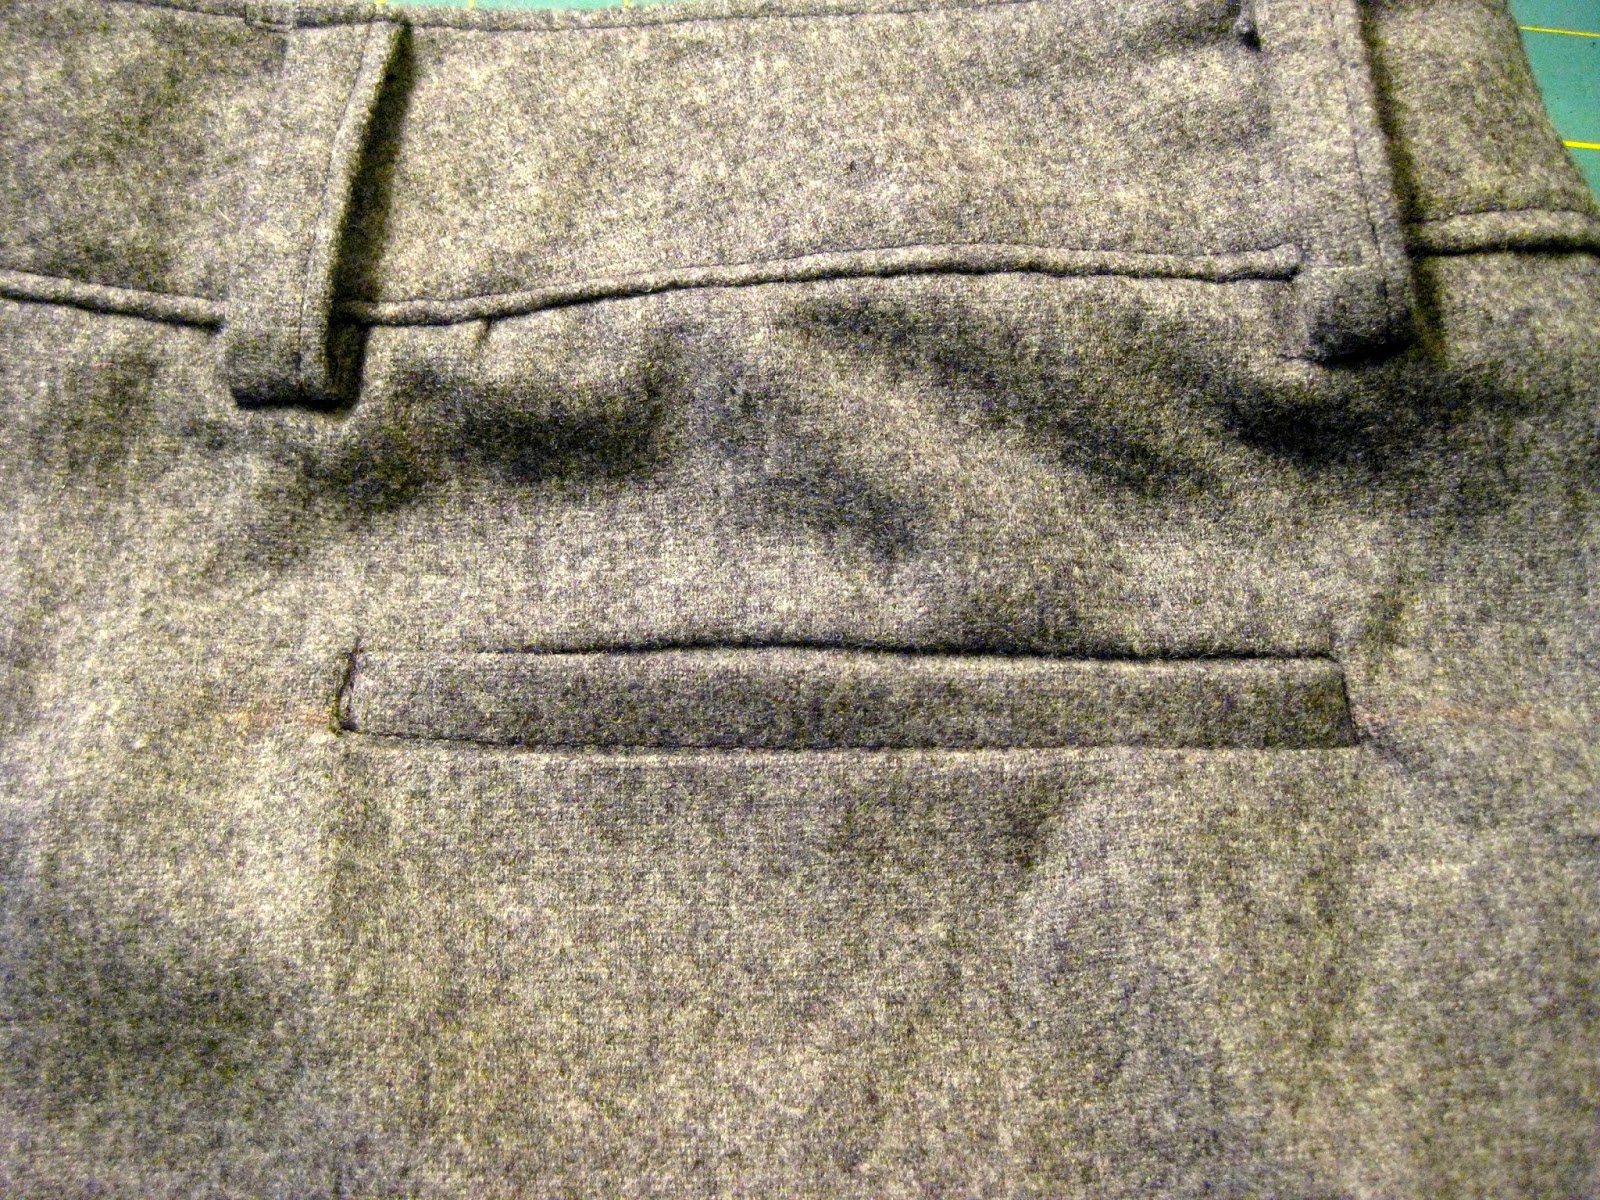
Again he wanted welt pockets in back instead of the patch pockets that are on the pattern. I'm getting a little batter as the welt pockets, the last couple of times I had cut the hole too large and had to do some funky repair so they didn't get any larger. That included adding some interfacing the the sides to bond the fabric back together. This time I really took my time and paid attention to how far I was cutting and where I was cutting. I also used a light weight material for the pockets which I think helped make the pockets lay flatter and not bunch up like the cotton material did on the last pair of pants. 


After the pants I was able to get the Hawaii Shirt made. I cut this pattern out back in June and it sat on my sewing table for several months. I was able to get the shirt done on one afternoon. It's an easy pattern, Butterick 6015 from about 1980. I have made this shirt several times before for my husband and he really likes this pattern as it's slightly snug but not tight, it has 2 breast pockets and small slits on the sides. He picked out some nice ivory buttons and now he is wearing the shirt with his new pants. If you don't remember this is the fabric that we bought back in January of 2017 in Hawaii. I let my husband pick out material for a shirt or pants when we travel. That way I get to shop for fabric while we are on vacation and it makes the piece of clothing a little more special because it reminds us  of our vacation. 

Last month we celebrated our 10th wedding anniversary. Since Tin was the traditional gift for 10 years I bought a tin ceiling for my husband. The funny thing is we have been looking at 3 different patterns for about 3 years, we just could not come to an agreement on which one we wanted. I wasted a softer more organic look, husband wanted a more square art deco type of pattern. We put up 3 different tiles and had all of our friends tell us which one they liked. It was always a toss up on who got the most votes. So when I saw that Tin was the gift for our 10th anniversary I decided to give in and buy the tin tile that my husband wanted. The good thing about this ceiling is now I will get a hood for my stove. Which has to go in before we complete the kitchen. SO...now my husband has a project to complete this winter and that means I will have more time to sew.


A friend gave me an old shirt that he was going to toss out. I cut up the shirt using a Jallie pattern 2805 making it a more feminine shirt. Once I made it over I realized how grungy the white material had become...so I dyed it. I did a string wrap of the shirt and set it in some dark blue dye for 24 hours. It came out a little darker than I wanted but it's still a cool shirt & really comfortable. 
A friend recently asked me if I could do a small upholstery job for him. He had an old Telephone Table that the seat had ripped and the stuffing was coming out. With a lot of these older vinyl chairs the vinyl gets dry and brittle, I for one have cut my legs on older vinyl chairs where the material has become ripped and is sharp. I had a head liner from a 82 Volvo that a friend gave me, I had made a couple of bags with that material and it looked perfect for the seat of the table. I took it over and left it on is porch. He called me later as he was happy to see the seat repaired and thought it looked great. 

And last but not least...I want to say Thank You to my mother..who would have been 81 yesterday. She sent me to sewing lessons when I was about 12 years old. She encouraged me to sew as she came from a family of women that sewed. My great Grandmother made quilts and my grandmother made clothes for her and my mother. My mother in turn made clothes for my sister's and myself. When I turned 18 my parents gave me a sewing machine. I used the Montgomery Wards sewing machine till about 6 years ago when I finally bought a new more up-to-date machine. I still have the Montgomery Wards machine to this day. I miss my mother and every day think of things I did not get to ask her, she was a wealth of knowledge when it came to sewing and gardening. 

Friday, October 6, 2017

1981 Volvo 240 Interior turned into a Bag


I tend to gather odd textiles, last year a friend gave me some white vinyl that he pulled off the interior seats of a 1981 Volvo 240 station wagon. I was not sure what I would do with the fabric but I took the fabric with the though that I would turn it into an outdoor pillow or cover an outdoor chair.  The other day I was getting ready to teach a free workshop on reuse. I like to show participants how to make a bag that I found in a free Craftsy class taught by Kristin Link. Kristin ran the website SewMamaSew for several years. In 2015 she started a website called Craft Industry Alliance with another woman. I like to make her bags because they are quick and are perfect for repurposing found textiles. I have used old shirts, jeans and table runners to make these bags in the past. 

As I was looking around at all my stray textiles I saw the large bundle of vinyl. It immediately though it looked like the perfect material to reuse for this workshop. I looked at several tops and handles for the bag before settling on a simple black to make this a sleek and modern looking bag. I wanted a bit of color and found a Hawaiian print dress that I had set aside because I really liked the color and the fabric of the material. The dress was cut on a slight bias so the fabric was difficult to lay out and sew together.  
The out side of the bag is simple to cut out, I used wonder clips to hold the fabric together instead of pins which make holes in the vinyl. I also used a longer stitch length about 3.5 so that the stitching would not just perforate the vinyl and cause the seams to tear apart. 
The biggest problem I had was the interior. Since I used a dress I had issues with some of the fabric that was cut on the bias. It stretched out a little and became a little off shape as I sewed the interior together. I did manage to get it sewn together and I know of these issues are not apparent when you look at the bag. 


I like the way the bag turned out and plan to make another one. This time I will cut the interior so that I do not have as many problems with the bias. I have a Hawaiian shirt that I can cut up and this time the fabric is cut on the straight of grain so the lining should be a little easier to sew. 

Monday, September 25, 2017

3 Quilts and a Pair of Sushi Pants


My husband gave me the Legendary quilt pattern from Elizabeth Hartman a couple of years ago. I kept putting it off when it came to making it as there were sooooo many pieces. About 180 half square triangles for the background of the trees. Well I finally  cut it out and finished it in late April. I like the quilt top,  now I want to make it was a dark blue background and the  Abominable Snowman or as some people call it a Yeti in place of the big foot. The pattern actually goes together quickly its the cutting that killed me. I spent 2 days cutting and you have to be very organized and accurate or you will have issues when the whole thing goes together at the end. I saw a woman that made this same quilt but staggered the trees and had a sun in the corner. I liked the way that flowed. It had a much more organic feel to the quilt top then lining up the trees and big foot. I love Elizabeth's patterns but they are all very precise, I tend to like randomness in quilting...like the quilt below. 


I love Pendleton Wool. Living in Portland I'm close to one of the mill outlet stores and I go there often to get wool scraps. I have been collecting cream with yellow and black stripes for the last couple of years before I finally got enough to make this all wool quilt. It then took me a year to figure out the back and what I was going to do to quilt the piece. It's heavy so I knew I would not need a batting. I wanted a simple fairly lightweight backing that would not take away too much from the front of the quilt. 
I found a bolt of yellow wool fabric at a place called City Liquidators, they usually do not carry fabric but they had bought out a fabric store that closed about 5 years ago. The fabric store had a strange mix of polyesters from the late 70's, batik fabric from India, Cotton Jersey and strange uniform looking shirts. City Liquidators was selling the bolts of fabric for $25-$100 a bolt. There was a lot of fake fur and upholstery fabric that was the $100 bolts.  I found a bolt of yellow 100% wool fabric (about 16 yards) for $30. I'm not a fan of yellow but I could not pass up that much wool fabric for such a cheap price, I figured I would find something to do with that yellow fabric. 
After I finished the quilt top it lived on my wall for about 6 months. Looking through my fabric one afternoon I realized that the yellow fabric would be a great backing for the Pendleton Wool Quilt. 
I decided to tie this quilt because I thought it was too thick to put through my sewing machine. My husband cals this the Canadian Winter Blanket, it has been kitty tested and kitty approved. It's a 52"x 72" 100% wool quilt.


I found this quilt top at a resale store called ReRun in Portland. I think it was about $15, maybe $20, it was 88"x88". I liked the turquoise color and the Sarah Jane  Mermaid fabric that was used in the quilt. I was going to take this to the long arm and quilt the piece but in the end decide to tie this quilt too. I used a fluffy polyester batting so it was a little thicker, but not too heavy. It's a nice bright quilt that we used at the end of summer on our outdoor bed. 

 I finally finished the Sushi Pants for my husband. We bought the fabric in Hawaii last January and I kept putting off making pants for him as I made other things (like more quilts that we really do not need). They are a simple elastic west pant, with larger pockets. The pattern is Simplicity 3645, it very easy to sew. Needles to say he put the pants on as soon as I was finished & wore the pants the rest of the summer. 

Monday, April 24, 2017

Laurel Hedges


In the back yard I had a HUGE Laurel Hedge. It was a pain to trim and had been growing since the mid 40's. There are photos of my Aunt in the back yard with a nice small hedge behind her in the photos. My husband had built a platform for our bed in the summer of 2007, it was nested into the laurel hedges. The treehouse made it difficult to trim the laurel. We trimmed it about 8 years ago but otherwise it has grown wild and HUGE over the last several years. Well last fall I made the decision to get it trimmed. We had a very difficult time trying to find anyone that would trim the laurels (they were over 40 ft tall). A lot of people would trim the walnut tree but would not touch the laurel. When we did find someone to do all the work they came and topped the hedges. They looked terrible but I knew they would grow back...laurel always grows back. 


As I stated before the laurel was quite large and when the tree person topped the hedge he left all the branches that were sticking out the towards the neighbors house intact. Only problem was they were laying on the neighbors garage. I knew we would have to do something soon the laurel was rubbing his roof and causing leaks. 
That brings us to a couple weeks ago. We had a nasty wind storm and my neighbor lost some branches from his tree onto his garage. He got up on the garage and saw how much of our laurel was on his roof and cut back all the branches that were laying on his garage. Now the hedges looked like a sick tree with a couple of green leaves left for color. It would take another year for the hedges to come back. 


I had wanted to get rid of the laurel for a long time so that is what we did. We cut one of the large tree size laurels down to the ground and replaced it with containers of bamboo. It took about 3 days for us to cut down the large laurel, our friend brought over his chain saw and even he had problems cutting into the base of the laurel. The stump was about 3 ft around. and very heavy. Several of the branches had grown into each other to make one large base for the laurel. This stump took 3 people to move it from the back yard to the side yard to be hauled away. 


Nancy wants to know where the laurel hedge went, she loves sitting in the bush watching squirrels and birds. I know it was a hunting ground for her...but it's gone. We did not grind the stump and that may come back to haunt us, but for now it's covered with landscape barrier cloth and 3 inches of crushed rock...on top of that is a 6ft long container full of rock, soil and bamboo. 


As you can see in some of the previous photos the neighbors garage was kind of ugly. Since we are outside a lot during the warmer weather we wanted to look at something nice. My husband talked to the neighbor and he agreed to let us nail cedar boards to the side. We had a canvas that was given to me by a friend and we put that up too. We are going to paint a raccoon on the white boarded up window. 


The bamboo was installed last week, on a beautiful 70 degree day. It took 3 men about 3 hours to install bamboo. We had Golden Vivax Bamboo installed in 3 container that are 6ft long. The bamboo was already about 12 ft high so we started with a nice tall background that is pleasing to the eye. You can see the cedar fencing and the painting is a nice color spot through the bamboo. Another bonus is the sound of the bamboo in the wind...a nice rustling sound.