Showing posts with label sewing. Show all posts

Monday, May 27, 2019

Psychedelic Western shirts

This pile of old sheets became this set of shirts
 A friend of mine has been collecting old bed sheets for some time. She asked me to help her make them into some western shirts. So off I went on a sewing vacation for a week to sew. Have I mentioned that the only part I don't like to do is cut out the patterns. My friend cut out all 3 of the shirts and the interfacing. I then set out to iron on the interfacing on all these shirts and then started the process of sewing them together. She kept me well lubricated and we completed these shirts in about 6 hours, the pattern is Simplicity 8473 from the 80's. I have also used McCall 6380, it's a decent pattern from the 70's. 


I liked the way this one matched. The pockets, cuffs and yoke are a different sheet than the main body and arms. But looking at the photos it's hard to tell that they are not the same. We attempted to dye the piping on this shirt but it came out as a very pale blue thus you can not really see the piping. 

This is a very bright shirt, we made a different western shirt from the green stripe material (you can see that shirt below). The piping on this shirt is reflective, so my friends partner can wear it when he rides his bike, hoping that the reflective part will give him a little more visibility. I was happy that the front lines matched up, too bad we didn't line up the pockets better. Next time we will pay more attention to the lines, but I don't think it really detracts from the shirt as there is so much happening already. 
 The Blue and Purple combination is quite flowery. We used blue snaps on the front.
These were the shirts that started the whole vintage sheet western shirts. I had helped my friend cut out the polka dot shirt on the left several years ago and she sewed it together. She then cut out the striped shirt and sewed most of it together before she shoved it in a drawer. When I arrived, she pulled out the shirt and I sewed on the front placket, sleeves and cuffs...to complete the shirt. I hate to cut out patterns and iron on the interfacing, so the fact that she had most of the things I hate to do complete made it easy for me to finish the project. 
Band from 1968 or today? The 3 shirts on the recipients. I believe they were quite happy and two of the men were surprised that they were allowed to keep the shirts. They all fit the men nicely we only had to make an adjustment to the length of the arms. I'm now on the lookout for vintage sheets, I will have to hit the garage sales this summer in search of cool looking sheets to make more of these lovely shirts. 

Monday, December 4, 2017

Sewing with Knits


I took a Craftsy class about 3 years ago called Sewing with Knits by Meg McElwee. I made a pair of yoga pants that were a disaster. The fabric I used was too stretchy and thus fell off me when I put them on. I liked the class, it gave me a lot of information about different types of knit material and how to work with different knits. Meg explained a lot about how to work with different knits, what to look for when choosing knits and how to do stretch tests to make sure your knit material with rebound. 
I was also surprised at all the different patterns that came with the class. There is a fleece hoodie, 2 different t-shirts, yoga pants and a dress. Printing out patterns and taping them together is such a pain in the ass I never printed out any other patterns from this class. A couple weeks ago I finally went back and printed out the pattern for the scoop neck shirt. I was getting tired of the old standard Jalie pattern that I have been using for the last 5 years and wanted something a little different. 

I usually do not add a neck band when I make t-shirts as they are always the first thing I cut off on ready made t-shirts. But this pattern is a bit of a scoop neck so I thought it would be fine to add a neck band...I'm glad I did. If I had not added a neck band I think the neck line would have drooped and looked shabby. 
I made another shirt to make sure I had the pattern down, this one I screen printed and gave to a friend. Actually it's a reverse screen print. When you use Soft Scrub as ink it will bleach out the material leaving an image in the material that is soft and part of the material. There is no ink sitting on top of the material. 
I wore my shirt a couple of times and decided I wanted the shirt a little longer. While watching the class again to get some specifics I saw a part about adding a hem band. I decide to add a band of material around the bottom of the shirt.  


I used a knit sheet that I found at a thrift store to make both of the shirts.  The sheet was an Amazon Basic King size sheet that was 100% cotton. There were a couple of small holes in the middle of the sheet, I have a feeling that is why it was donated to a thrift store...no problem for me as I cut around the holes. I have enough material to make one more shirt. It's an attractive grey color that will go with anything. I may try to make a v-neck or a longer sleeve shirt with the remaining material 


I think this scoop neck shirt is my new favorite. I expect to make more of these shirts and want to try making a dress version. I think this pattern will also work great in repurposing old t-shirts that are too large. 


Thursday, August 18, 2016

Granny Square Quilt


I made this quilt top a couple of years ago. I kept seeing this pattern pop up on flicker and found the original pattern here. I fell in love with the scrappy feeling of the quilt. I have a passion for scrappy quilts, you should not ever have to go buy 1/2 a yard of 10 different materials to make a quilt. I come from a family of seamstress so there was always scrap material around. 

I made the quilt top and actually forgot about it till one of my cats jumped up on the shelf and down toppled all my unfinished quilt tops. I pulled out the top and started to look for fabric to complete the back. I had a long piece of this lovely light purple that I wanted to use but I also wanted a little color...something simple but that still had a snap of color. I played around with different colors on my design wall and came up with a nice backing. I think the solid strip of turquoise and the red added a nice break in to the eye.
I had taken a class on the long arm machine at Modern Domestic last year, but just in case you missed that post...a quick recap...when I went to do my 2 hours of studio time I broke the machine...an $18,000 machine. A piece of thread broke in the bobbin and they were unable to get it out, the machine froze and they had to pull it all apart. This is the finished quilt that broke the machine. Needless to say I was a little shy to go back for fear that they would never let me use the machine again. 


SO this year for my birthday I signed up for another class to use the long arm machine at Modern Domestic, This time the class was 2 days, 3 hours each day. There were only 3 of us in the class and we each got turns playing with the machine after learning a design. I liked the wave pattern and the loopy pattern, I had done squares inside squares on all the quilts tops I had done so far.  After you take the class you get 2 hours of studio time. 


I finally went on August 11th, 2 hours of sewing on the machine and no problems....well one small one...I put the needle through my finger and broke the needle, but I did not break the machine. I also quilted part of the batting to the back of the quilt. The batting clung to the back of the quilt and when I attempted to roll the quilt on the arms it would not move. That is when I realized I had quilted some of the batting to the back. Oh well, now that I have done it I know what to watch out for when rolling and unrolling the quilt sandwich on the machine. 


I really like the look of this quilt, it's all puffy from the machine quilting and the loopy pattern that I used was a nice contrast to the granny square pattern. I really liked making this pattern I think I will try it again but make it much more scrappy. 

Thursday, March 24, 2016

Sewing Foot: Flower Stitch Attachment


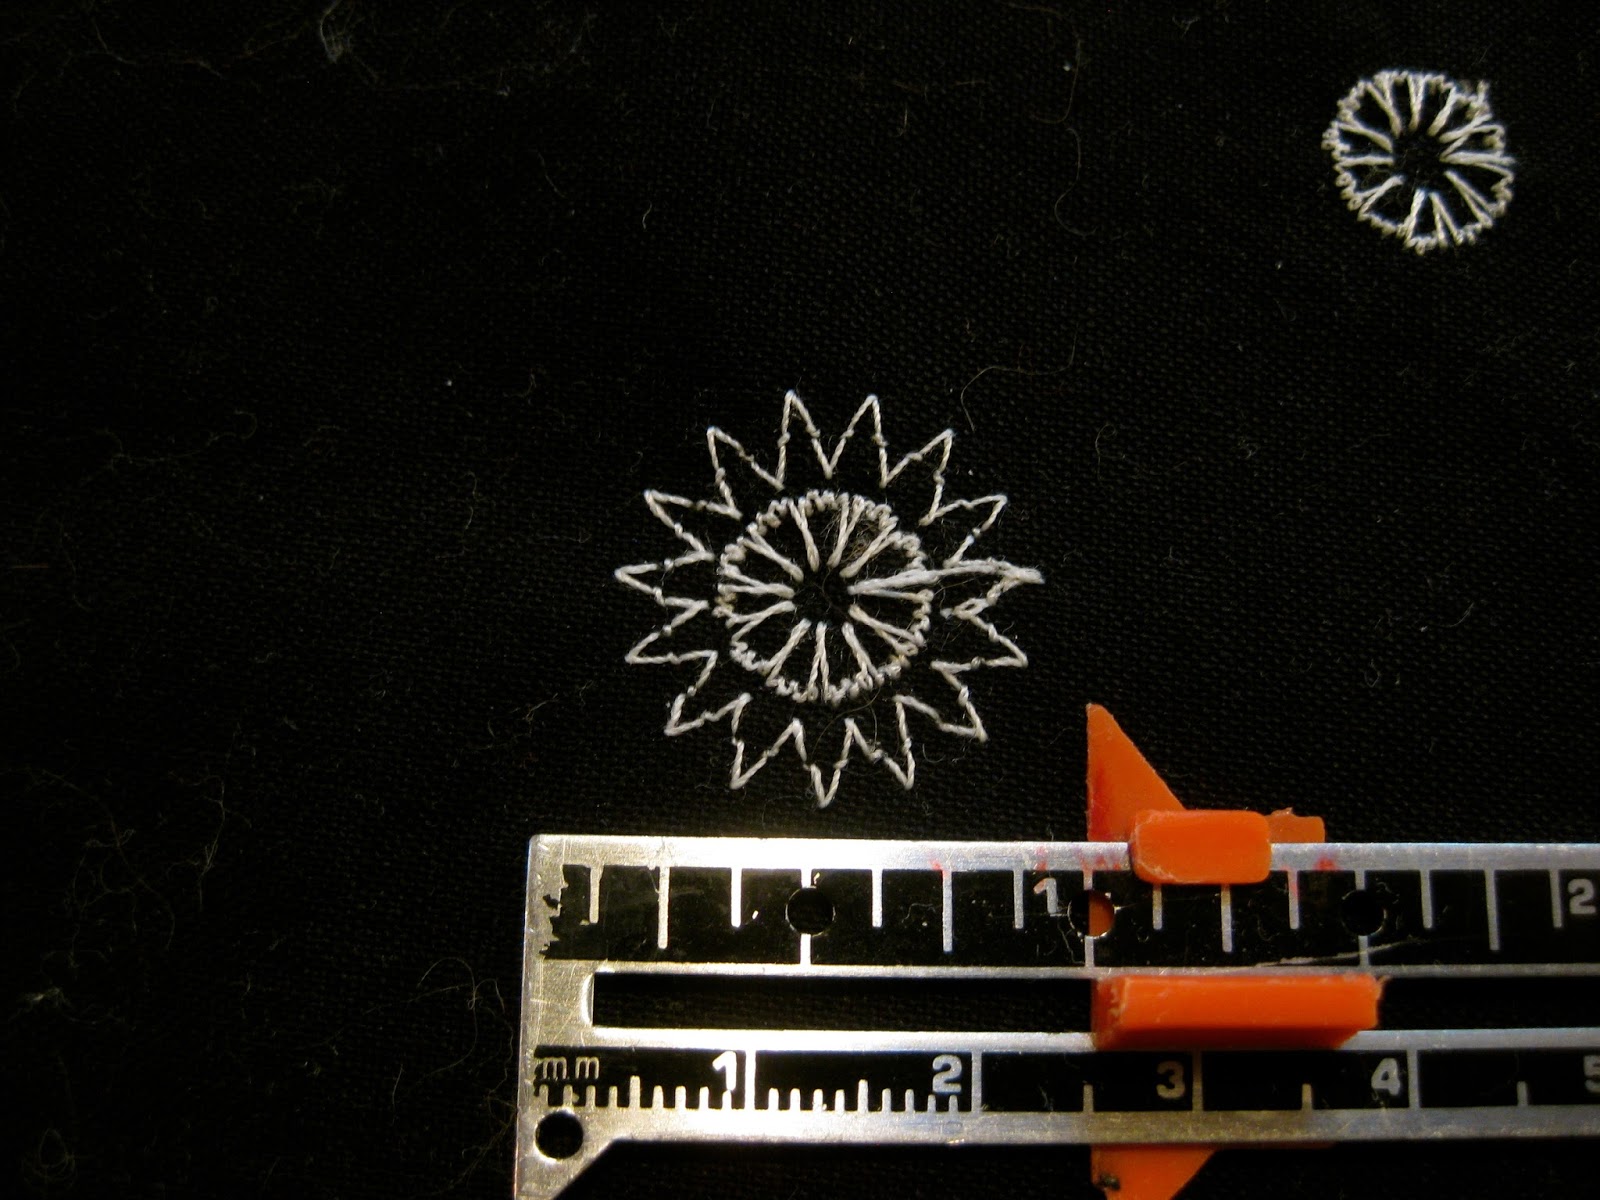
A friend found a sewing machine foot attachment at a rummage sale, the foot was a flower stitch attachment. She was not sure what it was or it did, so she went home to research the item. She saw the foot was sold new for $12-$16 she decide the $2 for the foot was a great deal. She went back to the sale and bought the sewing foot attachment and sent it to me!!! Of course it comes in a very cute box too.....How lucky am I!!! I saw one of these Flower Stitch attachment on "Sewing With Nancy" several years ago and though it was really cool. I was very excited to try out the flower stitch foot.

Since I had some white thread in my machine, so I pulled out some black material to test the foot.


You can make a several different flowers with any number of different stitches that are on your machine. The circle moves about 3/8" from side to side, so you can make small flowers or large flowers. The flowers will be different depending on where you move the circle part of the foot. 


After my initial testing of this presser foot I decided to try document the stitches I liked. So I stitched the original stitch on a piece of fabric then went back and used the flower foot to make a flower. You can see the different size flowers and what the stitch does when you increase or decrease the placement of the round part of the pressure foot. This will give me a better way to see what flowers I'm making and which stitched work best. I have over 150 stitches on my machine so it will take me awhile to get through all the different stitches, but this is a decent start. 

Friday, September 11, 2015

Sewing baskets and drawers


Everyone that sews usually has a sewing basket of some sort, sometimes it's a small tin, some times its a large plastic container and some times it's really cool drawers that hold all your sewing notions. One of my favorite things to find at an estate sale is the sewing basket. They are usually filled with forgotten treasures and cool notions. A friends mother passed away a year ago and she told me that she found something of her mothers that she thought I would like. We saw each other a few times and she said I still have that thing for you, I will get it to you soon. About a month ago she brought that thing over to the All Girl BBQ. To my surprise it was a set of old thread drawers filled with sewing notions that belonged to her mother. The set of drawers alone are a beautiful gift, but then to open them and find all kinds of other cool things...well I was blown away. The items in the drawers were beautiful, old scissors, beautiful threads, cool boxes and brass military buttons were just a few of the items that I discovered in the drawers. I wanted to savor the drawers, like opening a present that has several layers I kept finding things that made me smile. The items in the drawers were things that her mother had treasured, put aside to use at a later date or just saved because of course if you sew you will use that piece of ribbon on another project. 
The top two drawers had thread. Lots of thread on old wooden spools and in lovely boxes. I have heard that using old cotton thread is not recommended because it does tend to deteriorate. I really don't know if this is true or not, I have used old thread that I had on hand when making clothes. To date I have not had anything come undone or rip because I used old thread. Does thread have an expiration date? I'm sure there are some that say yes but so far I have been lucky and not had problems. The third drawer had a lot of old buttons & needles, most of the buttons were brass military buttons. There were 2 other small boxes, a small box of beautiful dark glass buttons and what looks like a gift box of Coats & Clarke thread and Milward Helix Needles. The bottom drawer was filled with iron on patches, seam rippers and scissors. There were a couple of very cute little shears, one with very decorative handles. My friend put some very cute ribbon in the drawers for me specifically because it was decorated with cupcakes. I can't wait to use the ribbon on my next Dottie Angel dress. 
My friend said that she wanted it give her mothers sewing notions to someone that will cherish the things in the drawers and use them. Looking at everything in the drawers she probably could sell everything at an estate sale, all the vintage notions would bring a decent price, not to mention that the drawers themselves are very cute. I felt honored to be given a gift of someone else's sewing basket as these types of things are very personal for each and every sewer. I know I have some random things in my sewing basket and one day I will get all the baskets that I have collected together and put together one supper sewing basket. Till then I will go from basket to basket looking for the perfect thread, button or random sewing notion that I know I have somewhere in my collection. 

Thursday, September 3, 2015

Dottie Angel Dress Simplicity 1080


I was very excited to finally get to make the pattern from Dottie Angel. It's a simplicity pattern 1080, and it was hard to find in the Portland area so I finally ordered it on line. I have been a fan of the Dottie Angel blog for a couple of years have always loved her style and in particular the house frock she was always wearing...it had nice large pockets. When I saw the pattern I knew it was a dress for me. I had several of the same problems that others had. The tucks were too high and the instructions for the arms was kind of funky. I have never put bias tape on the inside seams either. I'm glad I decided to make a muslin for this pattern as it was easy to fix what seemed to be fitting problems. Several others lowered the tucks by about 2" and did variations on the sleeve. I  removed the ties that go around the back. Thought I lower the side tucks and I think I can go even a little lower by about 1/2" or more as there is some strange gaping around the underarms. I like the pattern and it's pretty straight forward if you understand sewing. If I was a beginner I would have been very frustrated, I mean I was frustrated when I made the dress...it fit terribly...even my husband commented that it "fit weird". After researching on line about others problems here & here , you can also see Dottie Angel Facebook page that has several photos of the interior of the dress, these helped me a lot. The dress is super cute and when I made adjustments to fit my body it's really comfortable. I was happy that I made a muslin. The fabric that I used was an old sheet I got at the goodwill specifically to use the fabric for this type of project. Though now I want to dye the dress a little darker...maybe a blue. I can see myself making several of these over the winter months for next summer...or I can wear them all winter with a sweater...either way I see several more of these dresses in my future.