Thursday, August 18, 2016

Granny Square Quilt


I made this quilt top a couple of years ago. I kept seeing this pattern pop up on flicker and found the original pattern here. I fell in love with the scrappy feeling of the quilt. I have a passion for scrappy quilts, you should not ever have to go buy 1/2 a yard of 10 different materials to make a quilt. I come from a family of seamstress so there was always scrap material around. 

I made the quilt top and actually forgot about it till one of my cats jumped up on the shelf and down toppled all my unfinished quilt tops. I pulled out the top and started to look for fabric to complete the back. I had a long piece of this lovely light purple that I wanted to use but I also wanted a little color...something simple but that still had a snap of color. I played around with different colors on my design wall and came up with a nice backing. I think the solid strip of turquoise and the red added a nice break in to the eye.
I had taken a class on the long arm machine at Modern Domestic last year, but just in case you missed that post...a quick recap...when I went to do my 2 hours of studio time I broke the machine...an $18,000 machine. A piece of thread broke in the bobbin and they were unable to get it out, the machine froze and they had to pull it all apart. This is the finished quilt that broke the machine. Needless to say I was a little shy to go back for fear that they would never let me use the machine again. 


SO this year for my birthday I signed up for another class to use the long arm machine at Modern Domestic, This time the class was 2 days, 3 hours each day. There were only 3 of us in the class and we each got turns playing with the machine after learning a design. I liked the wave pattern and the loopy pattern, I had done squares inside squares on all the quilts tops I had done so far.  After you take the class you get 2 hours of studio time. 


I finally went on August 11th, 2 hours of sewing on the machine and no problems....well one small one...I put the needle through my finger and broke the needle, but I did not break the machine. I also quilted part of the batting to the back of the quilt. The batting clung to the back of the quilt and when I attempted to roll the quilt on the arms it would not move. That is when I realized I had quilted some of the batting to the back. Oh well, now that I have done it I know what to watch out for when rolling and unrolling the quilt sandwich on the machine. 


I really like the look of this quilt, it's all puffy from the machine quilting and the loopy pattern that I used was a nice contrast to the granny square pattern. I really liked making this pattern I think I will try it again but make it much more scrappy. 

Tuesday, June 28, 2016

Jam & Pies


This year all the berries have been ripened very early. The Strawberries were ready in the middle of May. That is almost unheard in my area of the world. I think I got a little too excited and bought a flat of Strawberries. Than I bought a flat of Blackberries (though they might have been Marionberries). I made several jars of Strawberry Jam because everyone loves Strawberry. I also made some Mango Strawberry Jam that is wonderful. The last batch of Strawberry was Strawberry Mango Mojito....very nice tasting jam if I do say so myself. I then froze about 3 pints of strawberries so I can have some later during the summer. 

Next up Blackberries....a batch of plain Blackberry, some Blackberry Lemon Jam, Blackberry Cardamon Jam, and some Blackberry hand pies. I also bought some raspberries becasue they are my favorite, froze a couple of pints and made some Raspberry Chocolate Sauce (though it looks more like jam). I used my Fresh Tech Jam machine...this machine makes jam in about 22 minutes. The nice thing is you can make small batches of jam, 2-3 cups of fruit will make 3-5 half pints of jam. I like to make small batches of interesting jams instead of large batches, it gives me room to experiment with spices and flavors.

Finally the Cherries!!! My neighbors have a Sour Cherry tree that the cherries were falling off the tree. So I got out the ladder and picked enough for a Cherry pie. I shared some of the Cherry Pie with friends because we had too much pie in the house. Everyone was happy with the results. 

I want to get some peaches or mangos this year and make some chutney. The last time I made chutney it turned out delicious and was devoured quickly. I haven't made it in a couple of years and I think it's time to make some more. 
Of course there is going to be a lot more canning this summer as I have purple beans, cucumbers and tomatoes planted in the garden. Last year we had an abundance of tomatoes and I finally figured out how to can a decent tomato sauce. So I'm looking forward to a lot more tomato sauce this year. 
Lastly...We went up and got the Trophy Wife yesterday. It's running OK, but it needs some work. I have to talk to my mechanic and see when he's available to help me get the car in tip top shape. 

Monday, April 18, 2016

Red, White & Blue Alabama Chanin Skirt


This skirt has been in the making for over 2 years. I originally dyed the red fabric in the summer of 2014. I was experimenting with Shibori tie dying. I bought some white cotton jersey from Dharma Trading for the dying process. I folded a yard of the fabric like an accordion then used several rubber bands to hold the fabric together. I like the red design but it had a little too much white for my wardrobe. I thought the fabric would be perfect as the bottom layer of an Alabama Chanin Bloomer Skirt, my favorite of all the Alabama Chanin skirts, I have 6 of the bloomer skirts. Some in the original leaf pattern and some in the paisley pattern. I wear these skirts almost every day, for everything from gardening to going out to dinner. 

The bookstore I worked at use to give us a t-shirt every year. After 25 years I had enough shirts, so I ordered a 6xl shirt, knowing that I would be able to use the fabric for something else. When I ordered the shirt I did not know what color it would be, when I got the shirt I though it was the perfect  blue color to go with the dyed red & white fabric.  

When I saw the New Leaves Stencil I knew that what pattern I would use on the top layer of the skirt. That took me another year to figure out who to get the pattern on the fabric. I was going to teach myself to use an airbrush but after a couple of attempts I realized that screen printing was way easier. I attempted to locate some rubylith, but it turns out that it's a lot more expensive then I remembered. I needed a very large piece and the only rubylith that would work came in a roll that was about $300. OK...I needed another way to get the new leaves design on my screen. I printed out the stencil from the latest Alabama Chanin book at Kinko's. It's large 25x40. I tried just burning the screen with the paper stencil but it did not work. So I decided to use a drawing fluid on the screen after drawing the images on the screen. Again it was problematic as the drawing fluid was old and a little too thick. I did end up making a screen and printing on the blue fabric but it was a lot more work than I had anticipated. The first color I used was a blue because I didn't want the ink to stand out too much. Well the blue ink I used matched the fabric perfectly and I was unable to see the stencil on the fabric. So I had to screen the skirt again...this time I used black. 

Now I had the skirt ready to sew. I spent a week stitching so I could do a reverse appliqué on the skirt. I started to cut out some of the design and my husband suggested that I not cut out all of the stencil but cut the stencil so it looked like vine wrapping around the shirt. I like that idea but I wanted he full impact of the red & white dyed fabric...so I cut out all the stencil. I may make another one with a vine type of design flowing around the skirt. That is another skirt for another post. 

The final result is a Red, White & Blue Skirt...it's my 4th of July out fit this year.

Thursday, March 24, 2016

Sewing Foot: Flower Stitch Attachment


A friend found a sewing machine foot attachment at a rummage sale, the foot was a flower stitch attachment. She was not sure what it was or it did, so she went home to research the item. She saw the foot was sold new for $12-$16 she decide the $2 for the foot was a great deal. She went back to the sale and bought the sewing foot attachment and sent it to me!!! Of course it comes in a very cute box too.....How lucky am I!!! I saw one of these Flower Stitch attachment on "Sewing With Nancy" several years ago and though it was really cool. I was very excited to try out the flower stitch foot.

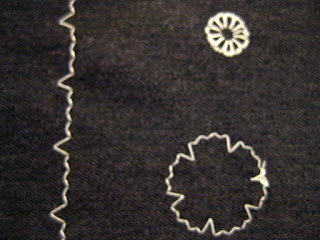
Since I had some white thread in my machine, so I pulled out some black material to test the foot.


You can make a several different flowers with any number of different stitches that are on your machine. The circle moves about 3/8" from side to side, so you can make small flowers or large flowers. The flowers will be different depending on where you move the circle part of the foot. 


After my initial testing of this presser foot I decided to try document the stitches I liked. So I stitched the original stitch on a piece of fabric then went back and used the flower foot to make a flower. You can see the different size flowers and what the stitch does when you increase or decrease the placement of the round part of the pressure foot. This will give me a better way to see what flowers I'm making and which stitched work best. I have over 150 stitches on my machine so it will take me awhile to get through all the different stitches, but this is a decent start. 

Monday, February 22, 2016

A Kitten Quilt


I received Elizabeth Hartman's quilt pattern "The Kittens" for Christmas. Since made her Fancy Fox quilt before the holidays and really wanted to try the kitten pattern. When I looked at the pattern I saw that there were a lot of small pieces. The eye's and noses are 1 1/2 x1 1/2 inch pieces. That scared me as I had tried some of Tula Pinks City Sampler 100 Modern Quilt Blocks and I did not do well with all the small pieces. I also have a hard time cutting out small pieces and made some mistakes when I was cutting. 


In several of the blocks you need 3 1/2 x 3 inch piece as well as 3 1/2 x 3 1/2 inch piece...so I had to be very diligent about marking and separating the pieces for the blocks. I cut out one block at a time then sewed it together, then another block and sewed it together...you get the picture. It was very time consuming but it kept me from making too many mistakes (of course there were a couple mistakes, but that is to be expected for the first time). I would also lay out the blocks so I knew what piece when where...this helped keep every thing organized.
I also marked my sewing line on the fabric when I first started making the blocks, it really helped me get a straight line when sewing the angels. After you make a few of these you don't need to mark the fabric but when you first start out it really helps. 

You can see that the marked line will disappear when you stitch the pieces together so no need to worry about the lines showing, they are all in the seam.  

This is a really cute quilt block and it's worth taking the extra time to cut the small squares and make the blocks. The final size of the block is 8 1/2 x 10 1/2. Mine are a little off but I can manage that when I add the sashing between the blocks. I may even get ambitious and make the glasses to go on one of the kittens.